|
Replay Video Capture Scheduler user
guide
Important: A new,
fully redesigned Scheduler is now available, Replay Video Capture version 10.4.1.0
(Preview here, Download here). Replay Video Capture
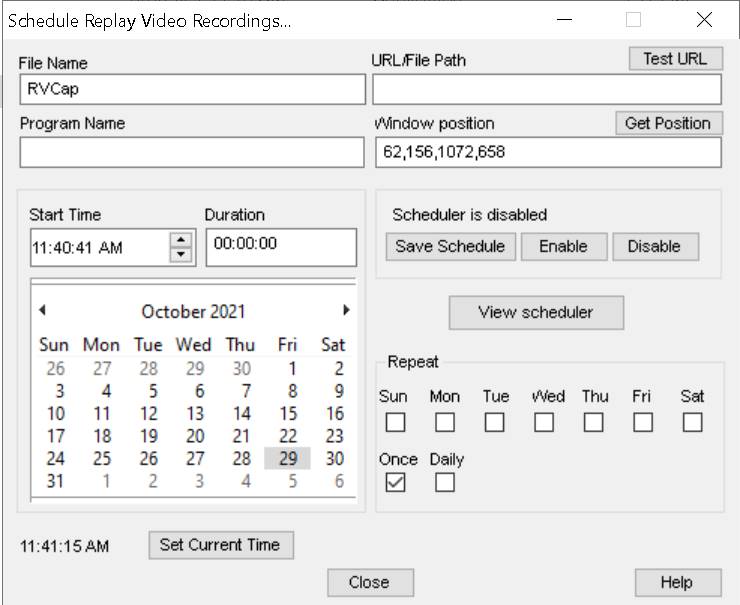
scheduler allows you to schedule one or more screen capture recordings. The
scheduler can memorize web site links, screen coordinates, start/end times as
well as different recording patterns like daily, weekly, day(s) of week. The
scheduled recordings are saved in the file schedule.log. This file can be
opened from the scheduler. How
to schedule recordings 1. Open Replay Video Capture,
open the web site you want to record, run the video, and mark the recording
area (use Get Video or Mark Video Window) - the recording coordinates and
window size are displayed in the WM Capture window. 2. Copy
the web page address (URL) from the browser address bar. You can close the
browser now. 3. Paste
the web page address from the browser address bar to the Scheduler URL/File
Path. Important: If using the Background
mode made sure to specify the browser name you’re using to record (chrome, chrome
canary, msedge, firefox, WM Browser) under the Program Name. It is a good
idea to click Test URL on the Scheduler main screen and make sure the browser
that opens supports the Background mode.
Important: Make sure the browser window
was maximized when you marked the recording area and the Maximize option is checked under
Tools, Scheduler. This forces the browser to open a maximized window such that
the video window matches your saved coordinates.
If you're
scheduling multiple recordings you can keep the Scheduler disabled until all
scheduled recordings are setup and saved. Then click Enable on the Scheduler
main screen. If the
start time of a recording is behind the current time and the stop time is
after the current time the recording starts immediately. If a web
page address is used and the Program Name field is blank the scheduler opens
your default browser. If you want another program to be opened you can enter
the full path or the Windows name of the program under Program Name. For
example chrome, firefox or the full path of a program. Note: If the saved screen
coordinates are the coordinates of the recording window, not the entire
browser window don’t change the browser position and size. Note: When recording
movies from Prime Video (Amazon), play then stop the movie, reload the
browser page, right click the ‘Continue Watching’ button then click ‘Copy
link address’ to get the URL. Use this URL for the scheduled recording. You
may change the clip start time by modifying URL autoplay extension or adding
?autoplay=1&t=0. (0 seconds to
start from the beginning or another number of seconds for another start time
(?autoplay=1&t=100 for example). You
can also use the ?autoplay=1&t=0 with Netflix URLs. Play then Stop the
movie, copy URL from browser address bar. Sometimes you can delete all the
text following the “?” in the URL and replace with autoplay=1&t=0 to
start the movie at your selected time. Opening the scheduler Open Replay Video Capture Settings and
click Scheduler then click Open Now. When the scheduler opens
the file name and the screen coordinates are shown on the scheduler main
screen. Files with the same names are not overwritten. The prefix
[1],[2]…will be appended to the filename. If there are
recordings already scheduled when the Scheduler opens but none of them is
within the recording time frame (start time > current time < end time)
the scheduler enters the “waiting” state waiting for a scheduled
recording to trigger. If one of the scheduled recordings is in this range the
scheduler enters the “counting” mode counting the time to finish
recording. In this case, Replay Video Capture begins recording until the end
time is reached. Enabling / disabling the scheduler The scheduler can be
enabled/disabled from Replay Video Capture
Settings. Click Scheduler then check or uncheck the item “Open
when Replay Video Capture
starts”. When this item is checked Replay Video Capture will open the scheduler
at startup and automatically start/stop recording at the scheduled times.
Otherwise Replay Video Capture will not record any scheduled events unless
you manually open the Scheduler. Scheduling multiple recordings Multiple recordings
can be scheduled however the recordings cannot run simultaneously. Changing / deleting schedules Click View. In
the dialog window that opens double click a scheduled recording or right
click the scheduled recording name and select Change or Delete
from the pop-up menu. |