WM
Recorder User Guide
- WM Recorder 15 stream and screen
recorder
- Overview
- Video
Tutorial
- Recording
Mode Setup
- How to
Record (download) video and audio from the Internet
- How to download YouTube
videos
- The
Mode Button
- How To Schedule Recordings
- How
to View and Play Recordings
- How to play recorded
YouTube videos
- The
Status Window
- The
View Window
- Settings
Reference
- Options
- Preview
WM
Recorder 15 stream and screen recording app
WM Recorder 15 adds a screen recording section
(Video Clone) to its regular stream downloading section (WM Recorder). Video
Clone allows you to record videos from your computer screen. These are videos
that cannot be downloaded, captured or decrypted. The quality of the videos
recorded from your screen is excellent.
Normally the two recorders should operate together. WM
Recorder works in the background, behind the browser windows and pops up only
when a video or audio stream was captured. Video Clone works in front of the
browsers and clones the desktop or a marked area of the desktop. Just click
"Start Recording" to record a video that was not captured by WM
Recorder. Find out more about Video Clone here.
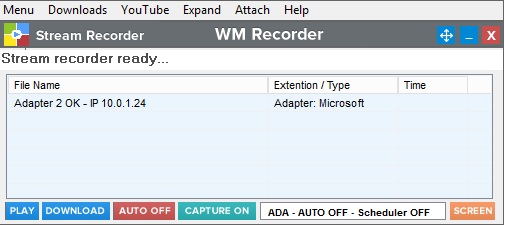
When you first open WM Recorder the stream and screen
recording windows are detached and they can be opened one at the time using the
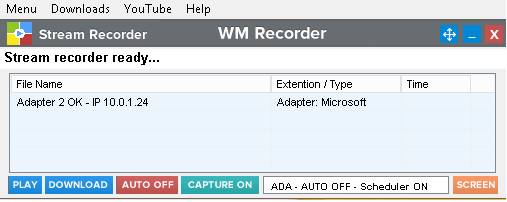
SCREEN button. Note however that the stream recording window will pop-up any time a downloadable media was
detected. This minimizes the screen capture window.
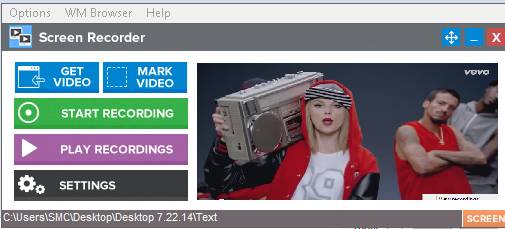
And here is the screen recorder (Video Clone) window
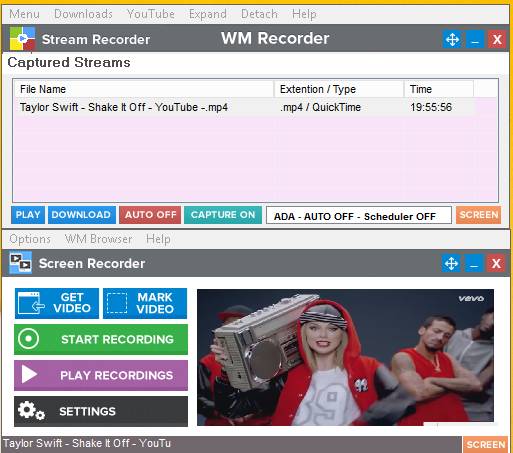
When you click Attach the two program
windows are shown togethher. Here is how the two
recorders look when they are used together:
Overview
Additional help and more details are provided on every WM Recorder
window. Click the Help button on the main menu.
WM Recorder is an easy and powerful way to record streaming video
and audio from the internet, saving it on your PC. Here is how the Main window looks when you open WM
Recorder.
All the popular streaming formats are supported, including:
- Flash™ Video FLV format files -
(HTTP and RTMP protocols)
- Windows Media™ (HTTP, MMS and
RTSP protocols)
- HTML 5 (YouTube)
- QuickTime™ HTTP (mp4)
- Streaming MP3 (Shoutcast™)
- Real Audio™ and Real Video™
(HTTP and RTSP protocols)
Important: WM Recorder is intended for use as a personal
archiving tool only. Please respect the rights of the copyright holders of any
material you record. WM Recorder can NOT record content protected by Digital
Rights Management (DRM).
Requirements
Supported Windows versions are XP,
Recording
Mode Setup
During the installation WM Recorder sets up the default recording
mode to
- The network monitor program
WinPcap failed to install.
- Your Internet security software
blocks WM Recorder files or WinPcap from accessing to the Internet.
- The network adapter utilized in
your computer does not allow access to its data.
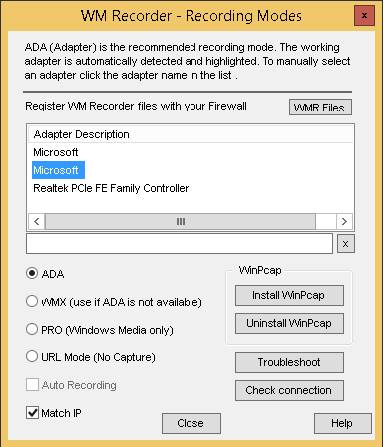
To select a different mode, click Menu, Settings, Recording modes from
the main screen to open the Recording Modes dialog:
Important notes:
- WMX mode requires that you open
a browser window from within WM Recorder (use the YouTube tab on WM
Recorder main menu or use the "Open recording browser"
under Menu, Options)
- Streaming Flash recording (FLV
files - RTMP protocol) is only available with
How To Record
(download) video and audio from the Internet
Recording is easy. There are a few different ways to do it - you
can record in Real Time, or record from captured URL's. Plus, you can choose
AUTO Recording Mode (click the AUTO OFF
to switch to
YouTube videos
downloading: YouTube web sites are now
encrypted as "https". WM Recorder does not attempt to decrypt the websites or to
download encrypted media files. To access the YouTube website using the HTTP
protocol (unencrypted) open the YouTube tab on WM Recorder main menu then click
Internet Explorer or WM Browser (WM Browser is recommended). These browsers
open the YouTube site using the unencrypted HTTP protocol.
WM Browser is a reduced version of
Internet Explorer and it should be used to playback video and audio that cannot
be detected when other browsers are utilized (Firefox, Chrome, Internet
Explorer). It can also be used with WMX recording mode and to screen capture
videos. You can open WM Browser from the main menu YouTube tab.
Here's how to record in Real Time:
With the AUTO recording mode enabled (
- Using your browser or your
media player, play the video or audio you want to record.
- Recording starts automatically.
The Main window
turns to Recording window
(see below).
Once the recording begins you can start playing and recording another
video / audio clip. There is no need to wait until playback has finished.
- To end one or more recordings
right click the file names in the Recording window and click Stop Recording(s) and select the
desired action from the pop-up menu. If you're recording fixed length
clips, TV shows or movies, the recording ends automatically, and there's
no need to click STOP.
With AUTO recording mode disabled (AUTO OFF):
- Using your browser or your
media player, play the video or audio you want to record.
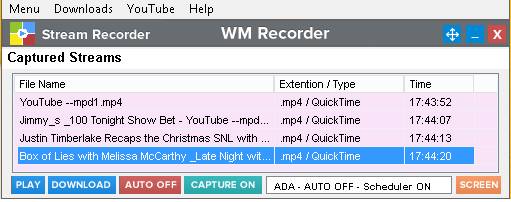
- The URL (Internet address) and
the File Name of the clip are displayed on the main screen now tagged as Captured Streams
window. Select one or more stream you want to record then click the DOWNLOAD button
to start recording. You can also right click the selection then click Start download in the pop-up menu.
Once the recording begins you can start playing and recording another
video / audio clip.
- To end one or more recordings
right click the file names in the Recording window and click Stop Recording(s) and select the
desired action from the pop-up menu. If you're recording fixed length
clips, TV shows or movies, the recording ends automatically, and there's
no need to click STOP.
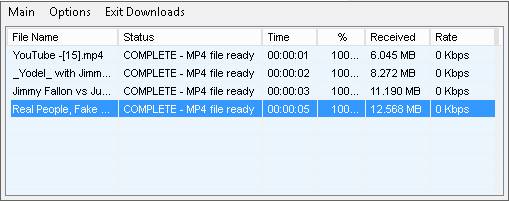
If you want to visualize the entire capture and recording activity
you can use the LIST view (click OPTIONS,
Change to LIST view).
Right click any item in the LIST to access the options:
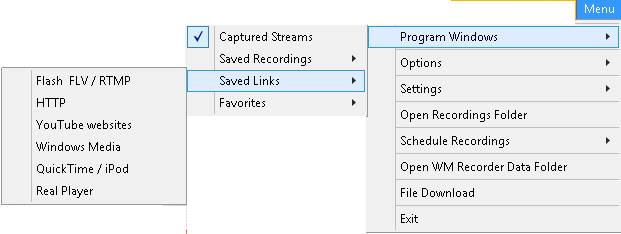
How to Record using saved URL's
All captured URL's are saved so you can access them by clicking Menu, Program Windows and opening the Saved Links window. Highlight one or
more URL's and click the Download
button to record the entire selection.
Options While Recording in Real Time
Here are a few useful things that you can do from the Recording
window while recording one or more files:
Preview one or more recording files. The files are
played back from your computer while the recording goes on. Right click a
recoding then click Play recorded file.
Turn your computer into an On Demand - Radio/TV player. As an example, record a
live Flash radio stream and click Play recorded file. You can now watch the
video or listen to the radio station and Pause, Rewind, Fast Forward.
Rename a recording file. The file names listed
in URL's do not always show the actual name of the media. You can rename the
recording before or after the recording is finished. to
do this right click the recording and select Rename current recording.
The recording modes
With WM Recorder, you can capture streams in three ways: Adapter
(
Adapter Mode is the preferred recording mode. No changes are made
to your computer settings. Successful setup of Adapter Mode depends on the
configuration of your network card(s).
WMX Mode operates by opening a browser from within WM
Recorder, which you then use to play the media you'd like to capture. This is a
backup option to be used only if
URL Mode lets you record from saved or manually
entered URL's without the need to setup a network adapter. This mode
should be used if you are not interested in searching the Internet for new
video/audio clips. Note that the URL Mode does not change any settings of your
computer.
Proxy Mode (no longer
usable)
PRO (Proxy) Mode will work
with ANY Network Adapter card. The Proxy Mode should be used if
A particular use for the
PRO mode is the PRO - Auto Recording
mode. In this case the entire stream data passes through the
recorder. This is recommended when recording streams that require the
connection to be initiated from a web site or when web site authentication is
needed. Also it is the only way to record Windows Media live playlists.
Note: Streaming Flash
over RTMP protocol cannot be recorded using PRO Mode.
Adapter and Proxy modes
monitor network traffic to record, but they do so in different ways.
To change the Recording Mode:
- Click the MODE button.
The Recording Modes dialog appears:
- Choose a Mode (
When choosing ADA Mode, WM Recorder will automatically choose the
best Adapter for you. It is always the default adapter that Windows uses.
Auto Recording
If Auto recording is selected, you no longer need to click Record
to start a recording. Every Audio or Video you play is automatically recorded.
Internet Connection Test
If you're not sure which mode will work for you, click Internet Connection Test, and WM
Recorder will choose the best recording mode for you.
How
to Schedule Recordings
With WM Recorder, you can schedule a recording to start and stop
at a specific time, date or series of days on any station. Up to 400 scheduled
recordings are allowed. Usually only Real Player and Windows Media streams are
broadcast live.
Here's how to schedule a recording:
- When a stream was captured and
listed In the Captured Streams window save the stream URL first. Right
click the stream and click Save
Links.
- Right click the stream again
and select Schedule recording
from the popup menu. The Schedule Recording dialog appears:
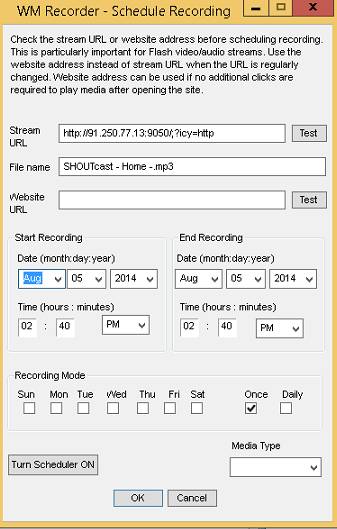
- Set the start and stop date,
start and stop time, and any recurring days to record. Click OK
when finished.
You can also use the Saved Links window (Menu, Program
Windows, Saved Links) to schedule recording.
Instead of using a URL you can use a website name provided
that the video or audio begins playing when the webpage opens (no other clicks
are required). In this case WM Recorder must be set on
Editing or Deleting Scheduled Items
You can view your schedule (to edit or delete a scheduled
recording) as follows:
- From the main screen, click Menu
and select Schedule
Recordings, Show Scheduled Recordings. The Scheduled shows list
appears:
- Right click the item in the
schedule, and choose Change Schedule to edit the item. Click Remove
Schedule to delete the item.
Hint: You can use the Windows Task Scheduler to automatically
start WM Recorder just before the scheduled time.
How to View and Play Recordings
To see what you've recorded:
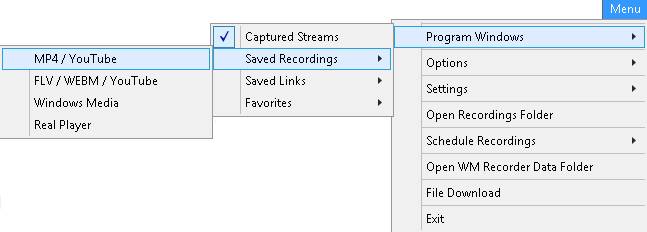
- Click the Menu button,
then choose Program Windows, Saved
Recordings. Choose the type of recording to view.
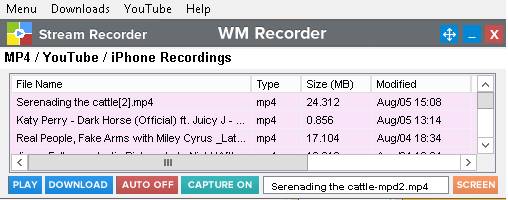
- In the Saved recordings window
double click the
file to view, then click the Play button at the bottom of the
screen. A Player window opens with your recorded file playing. For Windows
Media files you can select more than one file then click Play to
create a playlist and play the entire selection.
The Recording Window
Any time a recording begins the Recording Window is displayed showing the recording activity of all current recordings. To manually open this window click Downloads on WM Recorder main window.
This screen shows the progress of each active recording. Click any
of the column names to enlarge the column.
The displayed Time
is either the time it took to download and save the file (Download time) or the
number of minutes of video or audio that will be played (Stream Time). For RTMP
Flash streams this is always the actual play time of the broadcast. For many
high speed connections, you will be able to record a video a lot faster than
the time it takes to watch it.
YouTube
videos playback: most of YouTube videos
are now broadcasted as two separate files (video and audio). The recorded video
cannot be played until both files are downloaded and then mixed in one single
mp4 file. The message "COMPLETE - MP4 file ready" indicates this
operation is finished and the file can be played, renamed or deleted.
You can also select recordings and perform various operations on
them by right-clicking or clicking Options to display the pop-up menu.
Here are the options:
Stop Recording(s) stop recording the selected items. The message
CANCELED will appear.
Delete a recorded file CANCELED (file deleted) will appear.
Set Recording Duration lets you limit the
amount of time a recording continues. This is handy for recording live streams.

Play Recorded File plays what it currently recording on your
computer. The file must be at least 100 KB or the recording time greater than
20 seconds. Windows Media files cannot be seeked through while the file is
being recorded. MP4 files cannot be played until recording is finished.
Record Again rerecords the file, and does not overwrite the existing
file.
Convert Recording(s) opens WM Converter to convert
these files to another format.
Rename Current Recording allows you to rename the output file before,
during or after a recording session.
Play Remote Stream allows you to play the stream from the remote
web site (except the RTMP FLV files). You can watch or listen and record
simultaneously.
Close All Recordings terminates all active recordings and closes the
Recording Window. The Exit Downloads tab does the same.
WM Recorder Windows
Captured Streams
This window opens automatically when a
stream is detected. To manually open, click Menu, Program Windows, Captured Streams.
As you play audio and video, WM Recorder captures the links you
have visited. This makes it easy to return later and record something.
Saved Recordings
To open, click Menu, Program Windows, Saved Recording
This screen shows you what you've recorded. From the Saved
recordings menu, you can choose the type of recording to view. Select a show
and right click it to play, record it again, resume a recording, split a
recorded file, or reprocess a recorded file and make it seekable.
Saved Links
To open, click Menu, Program Windows, Saved Recording
Like Captured Links, Saved Links shows you what you've played, but
contains a longer history. Right click any URL to record it, schedule it or
play it
Recordings Folder
Select this option to view all your recordings within the Windows
File Explorer.
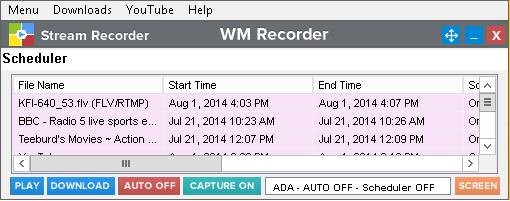
Scheduler
If you've set up scheduled recordings, they will appear here. Select
a scheduled item and right-click it to edit or delete it, or
activate/deactivate the scheduler.
File Downloader

Need to download a file from a specific URL? Just enter the URL
and desired file name, and click OK.
Settings Reference
Click Settings from the main screen to open Settings. Here
are the various options described in detail:
Settings - General
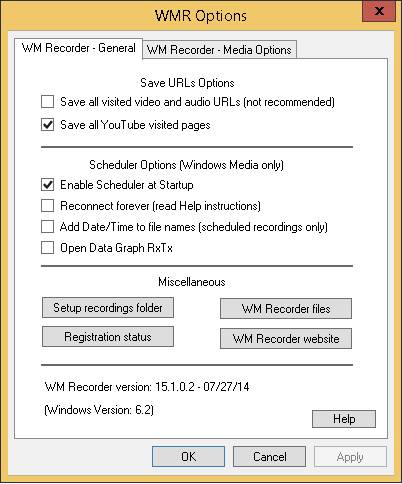
Save all visited video and audio URL's: Check this option if you
want WM Recorder to keep a history of all URL's. that
you have played.
Save All Visited YouTube Pages: Saves URL's of all the
YouTube videos you have visited while WM Recorder is open.
Enable Scheduler at Startup: Makes sure the scheduler is activated
when you open WM Recorder.
Reconnect forever: This option enables an unlimited number
of attempts to reconnect to a web file if the first connection request did not
succeed for any reason. It includes situations like network cables unplugged,
server-not-found or other reasons that would normally make Internet programs
terminate the connection process. This option is to be used primarily with
scheduled recordings. Do not use it whenever you have the option to manually
re-establish the connection. If a connection cannot be established for any
reason the recorder will try to reconnect at intervals of 2 minutes.
Add Date/Time to file names: This option adds the
date and time in front of the scheduled recordings file names.
Setup Recordings Folder: Change the folder where your recordings are
saved.
Attach Data Graph RxTx: Want to see how your bandwidth is being used.
Check this option to see a handy data graph.
WM Recorder files: Shows the executable files used by WM Recorder.
Settings - Media Options

Captured File Types: Select the kinds of
files you want to capture. In some cases you may not want redirecting file
types like asx
or ram files to be saved in the
Saved Links list.
Check all WMP Protocols: Ensures all Windows Media stream types are
captured, as well as all other protocols.
Send Player ID: Some streams require a Windows Media Player ID
to be sent. It is recommended to have this option checked.
Seekable Files: Post-process Windows Media files so that the seek bar works. This lets you jump to any position in
the recording.
Compress Time: If this option is set, any gaps in recording due
to buffering pauses are eliminated. The recording will play back without any
visible pauses.
Use WMSDK filter: This is a slower bu
mode to record Windows Media videos. Use this setting anytime there are playback or converting issues with recorded Windows
Media files.
Options
When you click Options on the main screen, the following menu
appears:
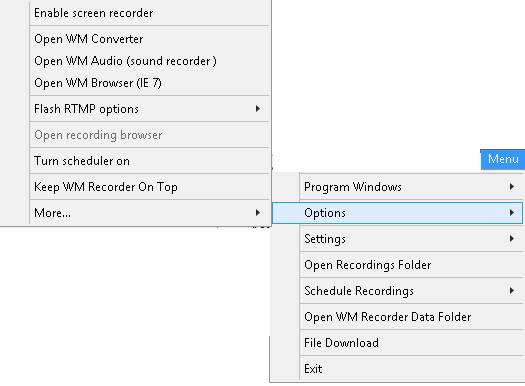
Enable screen recorder: Enables /Disables the
Video Clone
screen capture program to open when WM Recorder opens.
Open WM Converter: Launches WM Converter for file conversions.
Open WM Audio: Launches WM Audio for recording audio from your
speakers.
Open WM Browser: WM Browser
is a reduced version of Internet Explorer and it should be used to playback
video and audio that cannot be captured when other browsers are utilized
(Firefox, Chrome, Internet Explorer). It can also be used with WMX recording
mode and to screen capture videos. You can also open WM Browser from the main
menu YouTube tab.
Flash RTMP Download Options: : Change between high
speed and low speed downloading. Unless you're having trouble downloading Flash
video content, keep High Speed selected.
Open Recording Browser: Opens your selected Web
Browser. Useful for WMX mode, which requires a browser to be
opened by WM Recorder.
Turn Scheduler ON/OFF turns the scheduler ON and OFF.
Keep WM Recorder On Top: If this menu item is checked, WM Recorder will
always remain visible.
Other, Search Cache for Media: If you are unable to
capture a video as it is playing, it may be cached on your PC. (This happens
for YouTube and other similar sites.) Use this option to locate videos saved
already in your cache.
More, Turn Beeps OFF: WM Recorder will beep when recordings start and
stop, unless this option is turned off.
More, Check/Enter Registration: View or update your
registration code information.
More, Check Internet Connection: Is WM Recorder being blocked by a
firewall? Use this option to find out.
Google+