|
Overview
Installation
Background mode
Thumb Drive mode
Make a Simple
Two Clicks Recording
How to Set up WM Capture
How
to Record Videos (general)
Prevent computer from going to
sleep
Recording high definition
videos
How to Record from DVDs
Recording to DVD Files
How to Capture a Video Frame
How to Schedule a Recording
Playing your Recorded Videos
Adjusting the Volume
Settings Guide
Troubleshooting
Overview
Welcome to WM Capture, the only on-screen video
recorder specifically designed for high-speed video capture. With WM
Capture, you can turn anything you see on your PC screen into a high
quality video file you can play anywhere.
WM Capture is
especially well suited for recording:
- Movies
and Video Shows
- Webinars
- Streaming
Web Cams and Video Chats
- Video
Messengers
- Power
Point presentations and documents
- DVD's
- Any other
video you can't otherwise capture.
High Quality Recordings
Capturing and compressing on-screen video in real time
can require a lot of your PC CPU power. WM Capture is specially designed
for this task, as it uses special high quality MPEG-2 and WMV codecs that
give perfect looking recordings of videos without freezing up your PC.
Convenient
To make it easy to capture a portion of your screen,
WM Capture can often automatically locate the region of your screen where
video will be played. Or, you can choose to mark an area of the screen
manually by moving markers yourself. Either way, setting up your recording
area is a snap.
System Requirements
- Windows
XP-SP2, Vista, Windows 7, Windows 8 (Desktop mode), Mac (with Bootcamp
or Parallels installed)
- CPU
Speed: 2.0 GHz dual core recommended, 2.8 GHz single core
- RAM
memory: 512 MB or higher
- Recommended
with XP
Computers: Sound Card with a recording line (Stereo Mix, Master
Volume, Wave Out Mix, What U Hear or similar)
WM
Capture 7 cannot be installed on a user account that does not have
administrator privileges. The program should only be installed
on the administrator account however all clients will automatically get
shortcuts if the option “Make
shortcuts available to all users” is checked during the installation.
Every user has his own recording folder and settings. Only the
administrator can uninstall the program.
This is a new way of recording video from your
computer screen introduced by WM Capture. The recorded video doesn’t need
to be visible anymore. In Background mode you can hide the recording window
and use the screen for running other programs. You can read your email,
write documents or search the web while recoding your video in the
background. No other screen capture program offers this groundbreaking
feature at the present time.
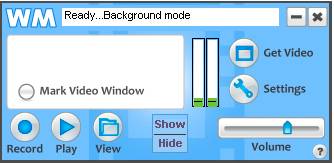
You can use the Show/Hide
button to hide/show the recording window.
The BCK mode can considerably decrease the CPU loading
and such higher frame rates can be achieved when recording large video
windows especially high definition (HD) videos. This makes high quality
screen recording possible even on slower CPU’s like those used in Microsoft
Surface Pro or other Windows tablets.
Note: the recoding window cannot be
minimized. Do not click the icon of a recoding window in your taskbar
as this usually minimizes a Window program. If you’re recording from your
browser and you want to open another
browser instance click the Browser
button from WM Capture main screen (see the image below)

In some cases, it may be necessary to include WM
Capture in your anti-virus allowed programs in order to enable the BCK
mode.
BCK mode
limitations:
On some Windows 8 computers the BCK mode does not work with Internet
Explorer 10. However other web browsers like Chrome and Firefox can be
used. The BCK mode may not work with some computer DVD players.
Thumb
Drive mode
This
is another new, unique feature introduced by WM Capture 7. When you enable
the Thumb Drive
mode you can move the program from one computer to another without the need
for another installation. To enable the Thumb Drive mode follow the steps
below:
·
Click the
question mark (Help)
on WM Capture window then click Enable Thumb
Drive mode.
The external drive installation dialog opens.
·
Plug your
thumb drive and
click DRIVES
until your drive name is listed. Then select the drive and click Install.

WM
Capture installs the folder “WM CAPTURE” and the shortcut “WM CAPTURE
shortcut” on the root of the drive. If your program is registered the
registration code is also installed on the thumb drive. To run the program
plug the thumb drive into any Windows computer USB
and click the “WM CAPTURE shortcut”. The recorded files are saved on the
folder WM CAPTURE\WMC Recordings located on your thumb drive.
Note:
If you want to record high quality videos you may need to have a higher
speed and higher capacity drive. In this regard it may be better to use
external hard drives than thumb drives due to their higher speed and
storage capacity.
Make a simple two
clicks recording (no setup required)
- Open WM Capture (if you’re
running Windows 7/Vista your desktop theme is changed to Windows
Basic. The Basic theme enhances
the performance characteristics (speed) of your system. Your current
theme will be restored when WM Capture closes.)
- Begin playing a video from your browser or
media player
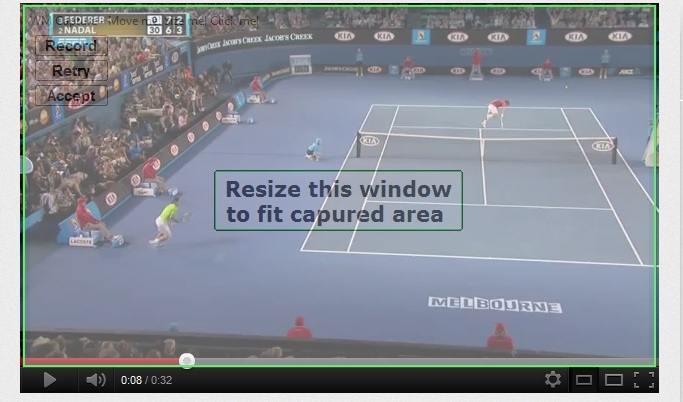
- Click Get Video to automatically
find the video on your screen and mark the video window. A transparent
window is now shown over the video area (see below). You can resize or
move this window to fine tune the recording area or click Retry to redo the detection.
- Click Record to begin recording.
How to Set up WM
Capture
For regular PC recordings there is no setup required.
Using the default video format Windows Media Player you record videos that
can be played back on any Windows / Mac computers or converted to other
video formats. If you need to transfer the recorded video to your mobile
device use WM Converter to convert to MP4/iPod/iPhone formats.
Click Settings on WM Capture main screen if you need to record high quality DVD / MPEG-2
videos, fine tune your video/audio parameters or access other options. In
the dialog window select the option you need.
Video Recording Setup
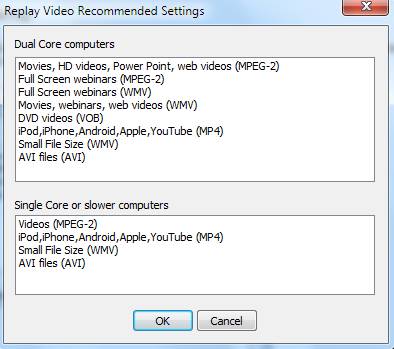
To configure preset video recording settings click Settings, then choose Recommended Settings. Choose
the selection that most closely matches your system:
Video/Audio Settings
To make subsequent changes, just click the Settings
button. The Settings dialog appears as shown below.
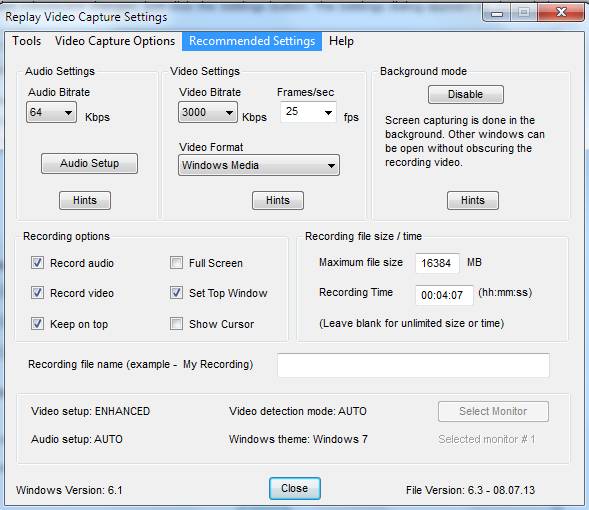
Video or Audio
Bitrate: the higher these numbers the better video/audio quality but
higher file sizes
Frames/sec: the higher this
number the better video quality. Note however that the number of captured
frames per second depends on your computer properties (speed, memory, etc)
and cannot always be setup to the desired value.
Set Top Window: makes WM Capture
main screen invisible to recording (when Basic Windows theme is used)
Video Format: use MPEG-2 for
high motion videos (movies), Windows Media for webinars, documents, full
screen/low motion video, small size recorded files, MPEG-4 (MP4) for
iPhone, iPad, iPod, Android devices or for YouTube submissions.
Video Capture Options
Any time
you change the video format, the Video Capture Options window pops up.
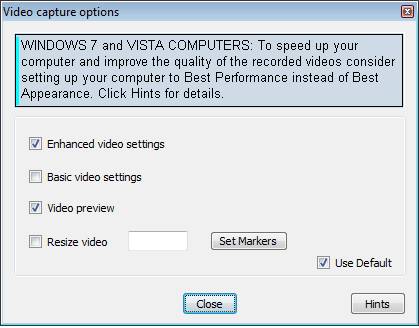
Here are the
video options that can be selected here:
The Enhanced
video mode includes enhanced recording features like dual monitor, pause
and video preview.
Basic video is provided for
compatibility with previous versions of WM Capture.
Video Preview – when this button is checked, a
small video window on the main screen shows what is being recorded
The Resize video
option can be used to resize the recorded video and is available only with
MPEG-2 video format. Please note that not every width/height combination is
accepted.
The Set Markers
option can be used to fix the recording area to a certain width and height.
Audio Recording Setup
WM
Capture will automatically setup the audio recording when installed. On
Windows 7, 8, Vista the default audio
driver is the Sound-Capture driver (see below). You can also use the Virtual-Audio driver however the Pause option is not
available when this driver is used.
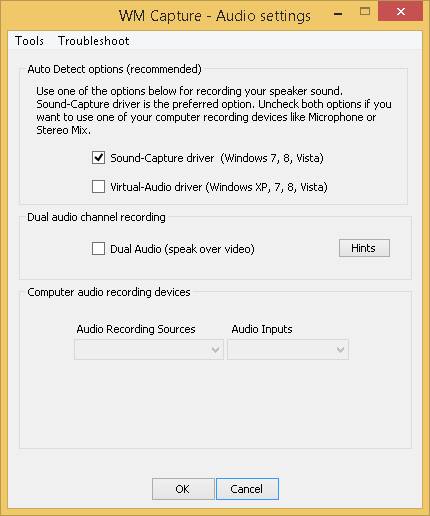
Important Note: Make sure your computer audio is NOT
setup on Surround or Quadraphonic sound. WM Capture can only record stereo,
44100 or 48000 sample rates. See Troubleshooting instructions if you need
to change your audio settings
For Windows XP:
The
default driver for recording the speakers is the Stereo Mix if your sound card provides this feature. To find out
if Stereo Mix is available double click (or right click) the speaker icon
on the taskbar and see if the Recording option is listed under Options or
Properties. In the Recording dialog check the "Stereo Mix",
"Wave Out", "What you Hear", "Master Volume"
"Rec. Playback" options if available. The Audio Setup can also
find your audio recording sources and setup them up. To do this open
the Audio
Recording Sources dropdown list
and select
one of the audio sources listed. If no audio source is detected make sure
they're not disabled.
If you'd like to record audio from the microphone or
line in, open the Audio Recording Sources
dropdown list and select
the audio device.
How to Record a Video
First, you need to mark a region of the screen to
record as a video, and then you can start, stop or pause
recording.
Important Note: In almost every
situation, you don't need to record the entire screen to get the best video
quality. Most video sources broadcast at no more than 640x480 pixels, and
then up-scale the video to fit a full screen. This means that you can
record at 100% (rather than 200% or full-screen), and get great quality.
Plus, recording from a smaller video rectangle ensures that WM Capture uses
less CPU power, and this makes smaller files and greatly reduces the
chances of dropped frames and choppy recordings.
A simple rule is to select the recording window not
bigger than ¼ of your screen area. If you’re recording a large window
located inside the browser you can use the ZOOM function (Ctrl -) to lower
the size of the browser and the recording square.
Changing Vista and Windows 7 theme
WM Capture 7 changes the Windows 7/Vista theme from
Aero to Windows Basic. This greatly improves the general speed of your
Windows system by disabling the Aero video effects. The result is a much
improved video capture of your screen. The initial theme is restored when
WM Capture closes. We highly recommend using this feature. If you want
different options open Settings,
Tools, Setup Windows theme.
Marking a Recording Region
To change between different marking modes click Settings, Tools,
Setup video detect mode
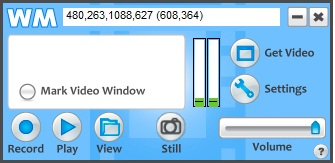
Version 6 provides a Manual and an Automatic mode to
mark the video recording area. The Manual mode is provided for
compatibility with previous versions. The coordinates of the marked window
are shown on the main screen (xTop, yTop, xBttom, yBottom (width, height)).
Using Get Video
The easiest way to mark a region is to use the Get Video function. Here's how:
Auto Mode
WM Capture can detect motion
videos and automatically mark the recording screen area. Begin playing your
video then click Get Video. A
semi-transparent window marks the video area on your screen. If the marked
area is not what you want click Retry
to run the detection again or move/resize window to fine tune the marking
rectangle. Note that static images cannot be automatically detected.
Note: The automatic detection of the video window is
done by a motion detection process. Therefore it is important to play the
video before using Get Video. An exception is made when recording YouTube
videos. In this case the video window can be detected and marked even if
the video doesn’t play.
Manual Mode
1. Click Get Video.
2. Move the mouse over
the window you'd like to record from. As you move the mouse, the recording
window will be highlighted.
3. Once your window is
highlighted, click the mouse, and the region is set. It's that easy!
You can often find a Windows Media Player video window
this way, or even locate an application window to record videos from. You
can also drag the markers to adjust the recording region. Click Home on the WM Capture main
window to remove the marker display.
Manually Marking a Region
Auto Mode
Click Mark Video Window. A
semi-transparent window is shown on the screen. Move and/or resize this
window to fit the video area.
Manual Mode
You can also manually drag the markers from WM Capture
to the upper left and lower right parts of the recording region. This may
be necessary if WM Capture can't locate the video window, or if you'd like
to record a region not defined by a window.
To manually mark a region:
1. Click Mark Video Window. The current
position of the markers appears.
2. Go to the
upper-left marker, and drag it with the mouse to the new top-left corner.
3. Repeat with the
lower-right marker.
Recording
Once you've marked an area to capture,
it's easy to record from it. Here's how:
Starting Recording
To start a
recording, press the Record
button. In a moment, the region you selected will be recorded as a video. As
you're recording, the Record button turns into a Stop button, and Play
becomes Pause.
Note that WM Capture main screen is invisible to
recording even if the main screen image overlaps the recording area. To
change this open Settings and
uncheck the box Set Top Window.
However, this is not recommended when the Auto detection mode is used.
Hint: You can also start
recording by using the keyboard. Press Ctrl+F12 to start and stop recording when WM
Capture is open. Click Settings, Tools, Hide WM
Capture to enable/disable the keyboard options.
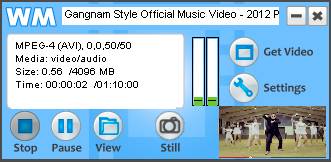
Important Note: The recording
quality is highly depended on the frame rate that can be sustained by your
computer. Normally this should be higher then 20 frames per second (fps).
In the above picture 25/17 indicates a preset rate of 25 frames per second
and an actual (achieved) rate of 17 frames per second. The ideal situation
will be 25/25. To achieve a higher frame make sure your recording window
size is not much higher than 640x480 (about ¼ of a regular screen size) and
your Windows theme is set to Basic for Win7/Vista computers.
Pause and Restart
If you'd like to pause
recording, click the Pause
button. Click Restart
to resume recording. You can also use Ctrl+F11 to pause and resume recording.
Stop Recording
Click Stop
to end the recording. Your recorded file is saved.
Prevent
computer for going to sleep
To prevent computer for going to sleep enable the Keep Alive option in Settings, Tools, Miscellaneous, Keep
Alive.
High definition video (HD) involves
display resolutions of 1,280×720 pixels (720p) or 1,920×1,080 pixels
(1080i/1080p). WM Capture can record these resolutions provided that your
computer has sufficient speed and memory. Usually a dual core 2.4 GHz / 4G
RAM should be able to handle the 720p requirements. Use MPEG-2 video format
(not DVD), 6000 kbps video bitrate and 192 kbps audio bitrate. For over one
hour recordings expect the file sizes to be in excess of 4 GB.
How to Record from
DVDs
Recording from DVDs is easy using WM Capture. Here's
how to do it:
1. Insert the DVD into
your PC, and play it using Windows Media Player.
2. Once the DVD starts
playing, resize the Windows Media Player window to approximately 1/4 of
your screen. The size of the video window should be as close to 640x480
pixels as possible.
3. Click Get Video in WM Capture, and
move the marker over the video window in Windows Media Player.
4. Once the video
window is highlighted, click the mouse. This sets the recording region.
5. Click Record, and play your video.
6. Click Stop when finished.
Note: You are legally allowed to record clips from
DVD's for your own personal use. WM Capture is not intended to be a way to
circumvent copy protection on copyrighted DVD's.
Recording to DVDs
WM Capture can write to DVD format and create ISO
files, which are easily burned to DVD using any DVD burning program. To
record a video in DVD format
- In
Settings select the DVD format, TV standard and aspect ratio. The
video bitrate is calculated to fit a 4 GB DVD in relation to the
recording time specified.
- Start
recording. When recording is finished click View then right click the
recorded file name (file name extension must be .dvd.mpg – do not
change this extension).
- In the
pop-up menu select DVD then click Make DVD files. The authoring
process begins. This makes the ISO folders and the VOB files. The DVD
has chapters distanced every 10 minutes but no menus. Therefore the
DVD begins playing when inserted in the DVD player.
- When
authoring is Done click File on the “Make DVD
files” window and select Open DVD folder. The two folders VIDEO_TS and
AUDIO_TS are the DVD ISO folders.
- Insert a
blank DVD, open your DVD burner (for example Roxio),
set burning type to Data or Data Disc, drag the two ISO folders in the
burner window and begin burning the DVD.
Here are some tips on creating the best quality DVD
files.
You need to make sure that your computer can
sustain a recording frame rate of at least 29.97 for NTSC, 25 fps for
PAL. XP dual core computers with CPU speed of 1.8 GHz or higher can
easily do this. However, on Vista and Windows 7 you may have to set
Windows to "Best Performance" mode instead of "Best
Appearance" as shown under Video Capture Options. To check if the DVD frame rate can be sustained, make a
short two minute recording, use DVD video format, 6000 kbps, 29.97
fps, 720x480 size. When recording, WM Capture shows
the actual achieved frame rate next to the preset rate in the Status
window. Make sure the actual frame rate does not go lower. If this happens
consistently you can still record DVDs but the video quality may not
be as good - especially for high motion scenes.
The recorded DVD file
needs to be "authored". The authoring process creates the DVD
folders VIDEO_TS / AUDIO_TS, which may take up to 10 minutes for a 2
hour movie. The DVD folders can be burned as Data Disc using
any DVD burner software (a two hour movie takes about 15 minutes to
burn.) The recorded DVD does not have a menu so it begins playing when
inserted into the DVD player. The DVD video has chapters
set every 10 minutes such that the DVD can be quickly scanned in 10
minute increments.
To maintain a reasonable frame rate of at least
20 fps even on slower computers:
- The
recording video size must be smaller than 1/4 of your
screen.
- Do not
use the Full Screen videos. Always try to make the video window
smaller.
- If the
video plays in a web page use the Zoom function of the browser to make
the web page and the video smaller.
How
to Capture a Video Frame (snapshot)
With WM Capture, you can capture a frame on screen as
an image file using the Still
button:
Here's how:
1. Play your video,
and make sure the WM Capture markers surround the area you'd like to
capture. If the Full Screen button is checked in Settings, the entire
screen is captured.
2. Click the Still button.
3. Your image is saved
in the Still subfolder located
under the recording folder.
Note: You can also save a screenshot while recording.
How to Schedule a Recording
You can make WM Capture open a program or a web page,
and start recording automatically at a preset time or according to a
schedule. Here's how to do it:
1. Click Settings, then Scheduler from the top menu,
then Open Now.
The Scheduler appears:
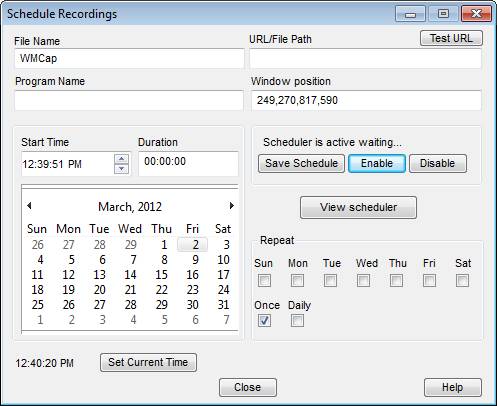
2. Within the
scheduler are these options:
File Name: What
name to use when saving the file.
URL / File Path:
What URL to open if recording a video from the web (make sure the video
window coordinates did not change).
Program Name:
What EXE file to open if recording from a Windows application (for example
C:\Program Files\wmplayer.exe for Windows Media Player).
Window Position:
The coordinates of the window to record from (top, left, bottom, right).
Start Time: What time of day to
start recording.
Duration: How many
hours:minutes:seconds to record.
Date: Pick the
starting date to record from.
Daily: Pick the
days of the week to record regularly broadcast programs. Select Once
if you will be recording just once. Pick Daily
if you will be recording seven days a week.
3. The Scheduler also
has these action buttons:
Enable: Start
running the scheduler so that scheduled items are recorded.
Disable: Stop
recording scheduled items.
Save Schedule:
Save your scheduled item.
View: View all
scheduled items.
Test URL: Open
the URL to make sure the program to record you want
appears.
Schedule Now:
Insert the current time and date into the schedule parameters.
To schedule a recording, set the Start Time, the Duration and
a file name for the recorded file. Then click Save Schedule.
Multiple recordings can be scheduled the recording times
cannot overlap.
Playing your Recorded Videos
Once you've finished recording, you can see your last
recorded video by clicking Play.
To see all your recordings, click the View button. The View screen
appears:
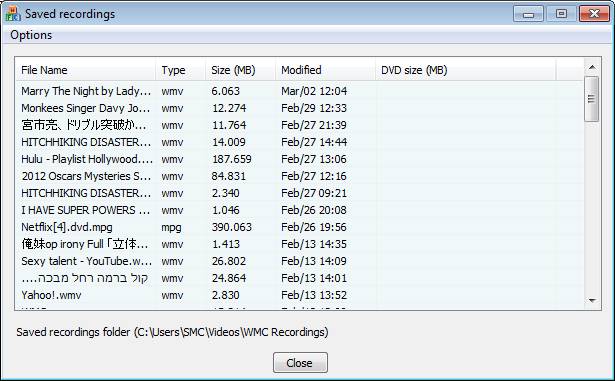
Double click a file to play it, or select and
right-click to play, rename or delete a recording.
Click the Open
Output Folder menu option to open a file explorer window
for your recorded video files.
Note: On some systems,
you may need to use the supplied MPEG-2 player instead of Windows Media
Player or other players that may be setup to play MPEG files in your
computers. Right click the file name and select Open MPEG Player in the pop
up menu.
Adjusting the Volume
The volume of recorded file can be adjusted using the Volume slider. When the Stereo Mix type audio source is
used the recording volumes as well as the audio volume of your computer are
adjusted. When audio is recorded using the Auto Detect option (available
for Vista and Win 7) this slider has no effect on the overall audio volume
of your system. The audio is recorded at constant volume even if the
computer volume is muted.
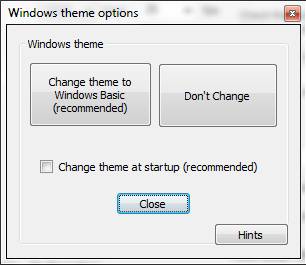
Select Windows theme
WINDOWS 7 / VISTA computers...
To increase the performance (speed) of your system and
avoid dropping frames consider setting your computer theme to Windows 7
Basic or setting Windows Performance Options to "Best
performance" instead of "Best appearance". “Best appearance”
is the default Windows setup. Dropped frames are video frames that are
skipped during recording because the processor (CPU) is busy performing
Vista video effects. To setup the Best Performance Windows mode click Tools on WM Capture Settings then click Windows Best Performance.
To select or deselect the Windows Basic theme click Tools / Setup Windows theme. Make
your selection in the dialog window that pops up.
Select video detection
mode
To select the video detection mode click Tools / Setup video detect mode.
Make your selection in the dialog window that pops up. The default mode is Auto.
Settings Guide
This section is a reference for the Settings dialog:
Recommended Settings: Use this button to
automatically configure the Audio Settings and Video Settings for the speed
of your PC and desired output quality.
Audio Settings:
Set the Audio Bit rate
as the quality for recorded audio. In general, 64 Kbps is fine for most
recording, but higher bit rates are better, especially when music is
involved. Click Audio Setup /
Test to locate or manually set the best audio recording
inputs on your PC.
Video Settings: Choose the Video Bit Rate, Frames per
second, and Video Format
(MPEG-2, MPEG-4 or Windows Media). The Recommended
Settings button will do this for you, but you can manually
adjust these parameters here if you like.
Disable Video Acceleration: Use this option if
you record Windows Media Player or Real Player windows on Windows XP or
lower versions. Otherwise keep this option unchecked.
Recording Options:
- Record
Audio:
Turn on or off audio recording. This is useful for making "silent
movies".
- Record
Video:
Turn this option off if you want to make WM Capture into an audio-only
recorder.
- Set
Top Window: This lets you set the recording window on top of other
windows. The window size must be smaller than ½ of the screen area.
Recording File Size / Time: This lets you
limit the time or file size for your recordings. Handy for unattended
recordings.
Tools menu:
- Hide WM Capture: Makes the WM Capture window disappear when
recording starts. This is useful for recording full-screen video for
example.
- Setup Output Folder: Choose the folder on your PC where
recorded files are to be saved.
- My registration: Use this option to enter a registration code, or
check your current registration information.
Video Capture Options:
Click Video
Capture Options from the top menu in Settings to access this.
The Enhanced video
mode includes enhanced
recording features like dual monitor, pause, video
preview.
Basic video is provided for
compatibility with previous versions of WM Capture.
Video Preview – when this button is checked, a
small video window on the main screen shows what is being recorded
The Resize video
option can be used to resize the recorded video and is available only with
MPEG-2 video format. Please note that not every width/height combination is
accepted.
The Set Markers
option can be used to fix the recording area to a certain width and height.
Universal Audio Driver (discontinued
starting with version 7.4)
Click Tools,
Universal Audio Driver (UAD) to access this option. This
should only be used by XP systems.
Enable: This enables the
use of the Universal Audio driver (for XP only.) On some systems, there may
not be a usable recording input available. The Universal Audio Driver
allows you to record audio on virtually ANY system. You should select this
if the Audio Test fails to locate any available recording input.
Delay Audio by __ milliseconds: In some cases, the
audio and video may be slightly out of sync when using the Universal Audio
Driver. (The amount is site dependent.) You can manually enter a delay to
help the audio and video sync better.
Disable Windows Sounds: Check this option
to disable sounds in Windows, which often interfere with the audio in your
recording.
Troubleshooting
I can't play MPEG-2 files created
by WM Capture
Some older versions of Windows Media Player
cannot playback MPEG-2 files. In this case you can use WM Capture simple MPEG-2
player accessible from the VIEW menu or the VLC media player.
Video quality is choppy
To get the best quality video - especially on slower
machines - try the following:
1. Go to Settings, and make sure you are
using the MPEG-2 video format. You can also try one of the Recommended
Settings options for slower PC's.
2. Try recording from
a smaller video window by resizing your player to 1/4 of your screen, or no
more than 640x4800 pixels. This won't affect the video quality (since video
is scaled UP from smaller sizes to fit a full-screen picture). This will
require less computer power to capture, which will make for smoother
videos.
3. Use a lower frame
rate. For example 15 fps or even 10 fps.
4. On Vista and Win 7
use the “Best Performance” mode instead of “Best Appearance” mode. To
change Windows video mode open Settings / Tools / Windows Best Performance
I'm having trouble recording
audio.
For Windows Vista: Use the Auto
Detect option under audio Setup/ Audio Setup.
For Windows XP: On some PC's, only
the Universal Audio Driver will work. Go to Settings/Tools,
and select the Universal Audio
Driver (UAD). Use the Universal Audio Driver only if the Test option fails to locate a
working audio recording line. Note that UAD may not work with Internet Explorer
or Chrome browsers on Vista and Win7.
The Universal Audio Driver Option isn't
working for me
To use the Universal Audio Driver, in some cases you
may need to open WM Capture before
opening your browser or video playback application.
The Video Window is all black
when playing back the recording
If this occurs, you will need to disable
"hardware acceleration" on your PC. Here's how to do it:
1. Right click on your
Windows desktop.
2. Select Properties in the pop-up menu.
3. In the Display
Property window click Settings,
Advanced, Troubleshoot.
4. Move the Hardware
Acceleration slider to NONE.
5. Click Apply.
6. Click OK in the message box displayed
by the video card.
7. Click OK to exit
If this happens while recording a DVD use
a DVD player that plays DVD without using hardware acceleration (for
example VLC Media Player).
I'm not able to play DVD's any
more since installing WM Capture.
WM Capture disables the video acceleration for Windows
Media Player when installed. This is required for capturing the screen
section where Windows Media plays the video. Otherwise, the recording shows
a black window. This feature can be activated or deactivated in WM
Capture's settings "Disable Video Acceleration" check box.
Here how to re-enable video acceleration in Windows
Media Player:
1. Open Windows Media
Player.
2. From the menu., select Tools,
Options, Performance.
3. Move the
"Video Acceleration" slider to Full and click OK.
I
get a "Cannot Run Graph” error message
The "Cannot Run Graph" error is related to the
version of DirectX installed on your machine. You need to have version 9 or
higher installed in order to run WM Capture. You should make sure you are
running DirectX 9 (or 10 if your graphics card will support it) and that
should take care of the problem. You can update your DirectX from
Microsoft's site here.
Also, you might want to try uninstalling WM Capture,
restarting your computer and re-installing it. Usually this has to be done
for it to realize that the proper version of DirectX has been installed.
I use Dual Audio recording but I can only
hear one audio channel
WM Capture installs an MPEG-2 audio codec capable of
playing videos with multiple audio channels. Windows Media Player is the
only player we know which can correctly pick this codec when playing back
MPEG-2 recordings. Use WMP to playback dual audio recordings. If you want
to have the two channels mixed in one you should re-record the dual channel
video.
I get a “Cannot install screen capture
filter” error
This error indicates that the screen capture codec was
not installed in your computer. In some rare instances this may be the
result of very restrictive security software not allowing activeX
components in your system. However this problem can also occur on some
custom Windows installation (especially Windows 7). Make sure the file
regsvr32 located in the folder C:\Windows\SysWOW64 and the regsvr32 file located in C:\Windows\System32 have the same
version.
I get “Recording error (x013). WM Capture will
close now”
This error indicates that recording could not be
started in less than 10 seconds for an unspecified reason. Disconnect the
second monitor, use Windows Media video format, use
Basic Video instead of Enhanced Video.
|