Stream File Name
Remote stream URL
Channel Data
|
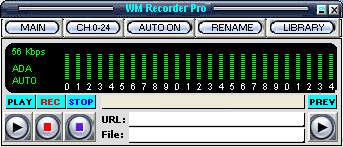
- The Main Screen
Windows Media Recorder (WMR PRO) can simultaneously record and playback up to 50
channels of video and audio. The Main Screen displays the recording activity of all active
channels and provides the controls necessary to initiate, stop and preview the recordings.
- Main Screen Buttons
PLAY - Play remote or saved stream. If AUTO mode is set the remote stream is also recorded
REC - Record the stream shown in the URL window
STOP - Stop recording a selected channel or exit a recording session
PREV - Preview / Play a selected channel from the local computer
MAIN - Open / Close the Main Window
CH 0-24 (CH 25 - 49) - Switch the display between the channel groups
AUTO ON / OFF - Enable / Disable the automatic recording
RENAME - Rename the file shown in the Channel Data window
LIBRARY - Add captured streams and web site links to Library
Channel Select - Click the channel number or the corresponding bar graph to select a channel
access to all settings and options of the program.
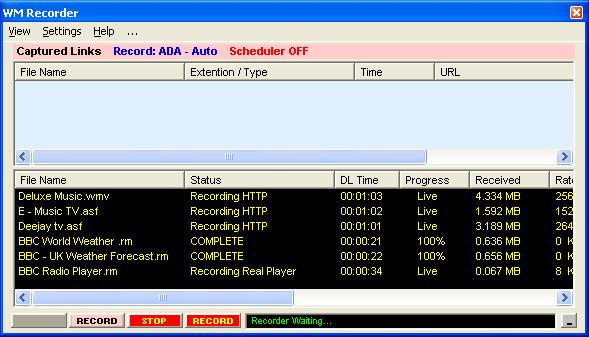
From the View menu you can access other windows
Captured Links - visited links captured in ADA or PRO modes
Saved Recordings - recorded files
Saved Links - saved links (URLs) captured or added by the user
Cached Links - media links cached by the Internet Explorer browser for the last 30 days
Scheduler - scheduled recordings
Internet TV, Internet Radio, Video / Audio Updates, Favorite Web Sites - a collection of
recordable links and web sites provided by WMR
File Download - download HTTP files
Recording window (black) - recording activity for all current recordings.
- To access the options available in any displayed
window select (click) one or more items in the first
column of the list then right click the selection
| |
||||||
| Clear the Capture Window when the listed streams are no longer necessary. |
||||||
- Recording Modes
Recording Modes
WMR PRO provides 4 recording modes, ADA, PRO, MIRROR, URL.
ADA (Adapter) PRO (Proxy) and MIRROR can be used to capture links and record in real time while
playing the content with the media player. If the AUTO option is ON the content is automatically
recorded. With the AUTO option OFF the links of the visited streams are saved. All the saved links
can be recorded later.
ADA and PRO require the media player to make the connection and start the play. Once this is done
the player can be closed or moved to another stream.
The MIRROR mode mirrors the media player. Media player is required during the entire recording.
The URL mode can be used to record links that you already know or if you're not interested in
searching for recordable links and real time recording. You can always update an expired link by
switching to ADA, PRO or MIRROR.
Setting up the Recording Modes
To setup a recording mode click Main on the Main Screen to open the Main Window. Then click
Settings / Options / Recording Modes and select the desired mode.
When selecting ADA mode for the first time the program WinPcap will be installed. ADA uses your
network adapter to detect the media player requests. The installation should be done manually. PRO,
MIRROR and URL modes do not use the network adapter.
Automatic Recording in ADA or PRO
To setup the automatic recording click AUTO on the main screen. The AUTO option can be used with
either ADA or PRO modes.
In ADA all streams played from Windows Media Player, Real Player, QuickTime, iTunes or Internet
Explorer browser are captured. In PRO mode streams played from QuickTime player or iTunes are not
captured. Once the stream is captured the recording begins automatically.
In ADA and PRO the recorder makes its own connection to the stream independent of the media
player. The media player can be closed when the recording begins. If you don't want to have two
connections running in parallel but still want to watch or listen the content you can close the player
and click the PREVIEW button. This will play the recording in progress from your local computer.
| |
||
| Try not to use the AUTO mode with the Real Player web browser. If multiple links point to the same file the file may be recorded more than once. A recording link in progress is not captured again until the recording is closed or finished. |
In ADA or PRO all visited links are displayed in the Capture Window. The last captured URL is also
shown in the URL window on the Main Screen. You can record the links in two ways
- From the Main Screen click the RECORD button to record the link shown in the URL window
- From the Capture window select one or more URLs, right click the selection then click Record on
the pop-up menu
- To record one or more links shown in any displayed window
select one or more items, right click the selection then click
Record on the pop-up menu. This applies to all recording modes.
If Saved all visited links option is set all visited URLs are saved for later use.
| |
||
| The number of items allowed in the Recording window is limited to 50. The Recording window must be closed before more items can be recorded. |
The Mirror recording is a unique recording mode specific to WM Recorder. With this mode you can
record streams that no other media recorders can. In Mirror mode the recorder does not establish its
own connection but receives data from the media player. In this case stopping the player also stops the
recording. If the player is re-started the recording continues. While recording the stream played with the
media player you can start other independent recordings from saved URLs as shown above.
The MIRROR recording should be used in special cases as an alternative to ADA or PRO. Below are
some common situations.
- Windows Media Player live streams where ADA, PRO, URL modes only record the
- first stream of the playlist.
- Real Player live streams from overloaded servers.
| |
||
| If during recording the media player lowers the play speed due to traffic congestion the recorded output may be static pictures or sound only. |
- Previewing Recordings
Using this option you can play one or more recordings in progress from your local computer. You can
use this WM Recorder unique feature in many ways.
For example you can create an Internet Radio Player that has a "tunning" button. Record a few radio
stations than click the recording channel and PREVIEW. In this way you can switch between the
recorded radio stations. For MP3 streams you can even use the REWIND and FAST FORWARD
features of the media player.
Similarly you can create an Internet TV Player that has a tunning feature.
In some cases you may want to use your local player and benefit from the video and sound
enhancement that may not be available from the Internet version.
Or, if you're recording a long un-seekable file and want to preview a portion of it you can open the
Saved Recordings window and use the option Make File Seekable. This makes the recording seekable
up to the current point. Available for Windows Media files only.
To preview a recording select the Channel and click PREVIEW on the Main Screen. Or in the
Recording window right click the file name and select the Preview option from the pop-up menu.
| |
||
| The number of channels you can actually record and playback simultaneously depends on your connection bandwidth and the computer speed. A cable connection (5 Mbps) can handle up to 30 live MP3 streams (128 Kbps)or 20 high quality live video streams (300 Kbps). For On Demand (timed) streams this number can go as high as 50. |
- Scheduling Recordings
Scheduling recordings can be done from the Saved URLs, Internet TV, Internet Radio, Video / Audio
windows. Right click the URL or the File Name and select Schedule Recording from the pop-up menu.
Up to 50 simultaneous scheduled recordings are allowed.
To enable the scheduler you need to set the Scheduler option ON. This can be done in
the Main Window / Settings or in the Scheduler window.
If the Scheduler option is ON the recording begins when the current time is greater than the start time
but smaller than the end time. Recording begins while WM Recorder is active or when you open the
program. This feature can be used to start one or more scheduled recordings using the Windows
Scheduler or other scheduling programs.
If the Scheduler is OFF no scheduled recordings begin however if the Scheduler is turned OFF while
scheduled recordings are in progress the recordings continue until the end time is reached.
To memorize the Schedule mode when closing the program check the button Enable Scheduler at
Startup in Settings. When this option is set you can use another scheduler - Windows Scheduler for
example - to start WM Recorder and the scheduled recordings at your convenience.
To view and change the scheduled recordings click View / Scheduler.
- Adding recordable links to your Library
While playing or recording a content you can add the stream and web site links to your Library. Click
LIBRARY on the main screen to open the Add to Library window.
Adding recordable links
Play a stream from your Internet Explorer browser then click LIBRARY. When the window
Add to Library opens the URL of the currently played stream, the web site name and description are
displayed.
- Click Get Site URL to update the web site if the description and link don't seem to be right. If
multiple web sites are shown click the caption bar of the web site of interest. - From the Category select the category.
- From the Country / Category list select the item where you want to save the link.
- Make changes to the Description (if any) and click OK.
- Internet TV, Internet Radio and Video / Audio
The Internet TV, Internet Radio and Video / Audio screens show pre-selected streams that can be
played, recorded, updated and organized.
Updating existing recordable links
- Right click the item that you want to update and select Add/ Change Program
- from the pop-up menu
- In the Add/Change window click Open Web Site.
- When the web site displays click Get Web Site to update the web site URL and description.
Play the video or audio stream listed in the web site. The stream URL
- is captured and displayed under Stream URL.
- Make changes to the Description (if any) and click OK.
Adding recordable links to existing country/category
- Right click the country/category.
- Follow the steps above.
Adding new recordable links
- Right click an empty space in the list and select Add New Program from the pop-
- up menu.
- In the Add/Change window enter a name for the Country/Category.
- Open the web site of interest. Follow steps from above.
- Reprocessing / Editing Recordings
These options are available from the Saved Recordings windows and apply to Windows Media and
Real Player Files.
Make File Seekable (Windows Media) option should be used if the recorded file was not made
seekable during recording. This situation may occur if the recording was not properly closed. By
default all recorded files are be made seekable when the recording is finished or closed.
Reprocessing files may be necessary sometimes to fix recording errors. For Real Player files you
can use this option to make recordings compatible with the Real Player Producer.
Split, Merge options are useful in many cases however the precision of slicing and joining pieces
of a file is not very high. Note that only files that belong to the same stream can be merged.
| |
||
| VBR (variable bit rate) audio files cannot be made seekable. In this case the file should be converted to MP3 or WAV. |
- Other Options
Most of the options available in WMR PRO are self explanatory. In the following we present some of
the options that require a little discussion.
Renaming Files
When capturing a link WMR PRO assigns a file name that is extracted from the URL. Many times
this name has no meaning for the user.
To rename a file before recording right click the URL then choose the Rename option from the pop-
up menus. Or, if the URL is shown on the Main screen enter a file name in the File window.
When the recording is finished or canceled you can rename files in the Saved Recordings windows.
To rename a file during recording click the Channel number or the corresponding bar graph on the
Main Screen then click RENAME. The file will be renamed when the recording is complete or
stopped. This can also be done in the Recording window. Right click the File Name then choose
Rename Recording from the pop-up menu.
Cached Links
These are media links and files cached by Windows when Internet Explorer or Windows
Media Player were utilized to play media from the Internet or from a local computer. WM Recorder
shows only media files cached during the last 30 days. These files are usually found in the folder
Temporary Internet Files.
You can record files that you have previously played before installing WMR PRO or files played
when WMR PRO was closed. To remove files from the cache select the files, right click the
selection then click Remove From Cache on the pop-up menu. Removing files from the cache is not
always allowed by Windows.
Starting WMR PRO when Windows Starts
Open the Startup folder
C:\Documents and Settings\User Name\Start Menu\Programs\Startup for Windows XP
copy and paste the program icon here.
- RxTx- Connection Speed Monitor
RxTx can be used to display the received and sent data rates. It shows you how fast is your
Internet connection or if the connection is lost.
Using the data graph (RxTx)
- To attach RxTx to WMR PRO check the button Attach Data Graph in Settings. The graph
shows the incoming data (Rx) in green and the outgoing data (Tx) in blue (when enabled).
The default units are Kbps (Kilo bits per second). The graph displays the input / output data
rates of your entire computer activity. - To access RxTx options right click the data graph and select Options from the pop-up menu.
- To display the average data rates shown in the graph move the mouse horizontally over the
graph. - Use the Toolbar option to place the graph on the task bar. If you want to place the graph in
a different place on your desktop uncheck the Toolbar option. - To move the graph window click anywhere inside the graph and start moving the